GARDEN PLOTS: Bearded irises will do fine with a late start
Published 6:00 am Tuesday, March 21, 2023
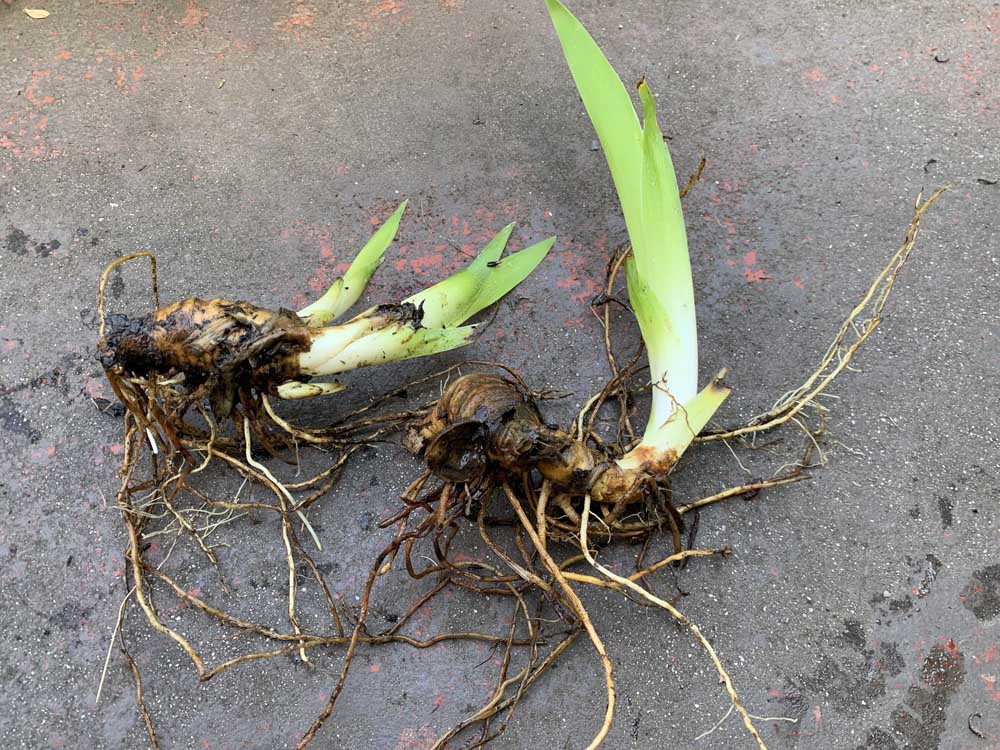
- Each iris division separated from the parent stem should have a growth tip and roots attached to the rhizome. Spread out the roots in the soil facing downward.
“Every afternoon I watched from the belvedere for a spell, and I saw the garden take shape. … And then one day I found it planted with bearded irises. The kind of irises that have gauzy [flowers] and come in every imaginable color. It wasn’t what I expected. I was really distressed.”
Trending
— From Mercè Rodoreda’s “Garden by the Sea” (translated ed.), 2020
I’m not sure the gardener/narrator in “Garden by the Sea” was upset about the bearded irises being planted in the next-door neighbors’ garden because he didn’t like Iris x germanica, or because he had recommended they plant his favorite rosebushes, instead. I tend to think it was the latter reason because later in the novel the gardener made a point of mentioning that the bearded irises were replaced with roses after all the irises had been trampled by drunken party guests.
I enjoy growing both roses and bearded irises in my garden and have found the few different I. x germanica cultivars I’ve grown (of about 60,000 cultivars available) to be quite hardy. Last August, I dug up several clumps of irises for transplanting, but was too exhausted by the heat and smoke to finish the job. They languished in pots over the winter, and now I’m just getting around to planting them.
Trending
Typically, it’s best to divide and transplant spring-blooming rhizomatous plants, such as bearded irises, in the fall because this allows them plenty of time to take root. However, my life doesn’t always play out in accordance with traditional planting timelines, and I’ve had success with dividing/replanting irises in early spring if I accept the fact that new divisions probably won’t bloom until the following year.
Since my iris clumps are potted, I can simply lift them out of the soil, rinse the rhizomes with water so I can see them clearly, and then use a sharp knife to cut the young rhizomes off as close to the parent stem as possible. Each piece of rhizome should have a growing tip and roots attached.
If my bearded irises were still planted in the ground, I would decide which rhizomes I want to remove and follow them back to the parent stem, digging carefully with a small shovel to unearth the rhizomes and the roots and separating the young rhizomes with my knife.
Once I have the divisions ready, it’s time to replant the rhizomes, which I consider to be the trickiest part of growing bearded irises. It is crucial that the rhizomes are planted horizontally so the top half is exposed to the sun. This allows the rhizomes to develop flower cells for next spring’s blooms. If you have bearded irises that aren’t blooming well, I would bet money it’s because the rhizomes are planted too deep.
I dig a shallow trench, add compost and bone meal (high in phosphorous for optimal root growth), and lay the divisions on top of the soil in groups of three or four. It’s important to spread out the attached roots facing down. Then I cover the roots and rhizomes with soil, gently tamp down the soil around them, and brush off soil on top to expose half the rhizome. I may need to add more soil around the rhizomes after thoroughly watering in the plants.
Many of my overwintered potted irises grew new tips beneath the surface of the soil, so when I’m planting them in the garden the tips initially lay flat, parallel to the ground rather than pointing up. Within a few days, however, the tips orient themselves to the sun. I take my cue from the irises — they do fine even with a late start.
Marketplace


-
eEdition

-

-
