GARDEN PLOTS: Rock on! Tips for rock gardening success
Published 7:00 am Wednesday, March 6, 2024
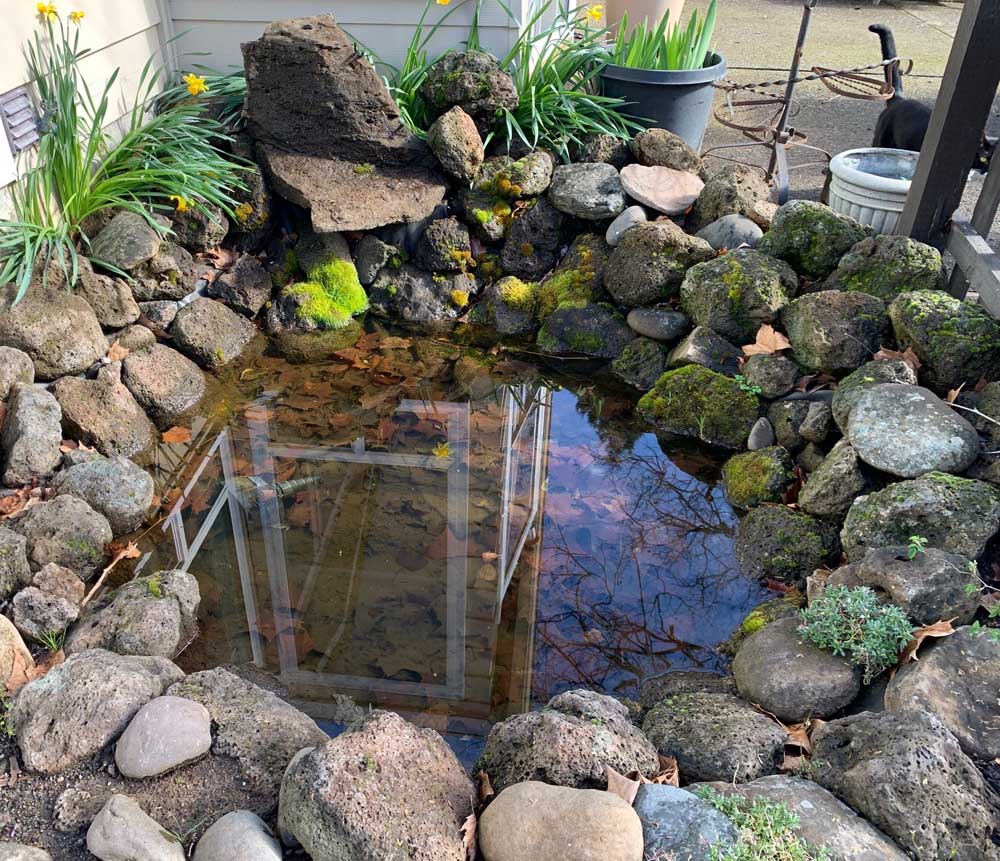
- The author built a rock pond in her backyard. Small plants can be grown in the rock crevices to give the pond a more natural look.
“[I]f you are already a gardener, becoming a rock gardener involves a little change of focus and rethinking some assumptions…Though creating a rock garden is different than making other sorts of gardens, the techniques and methods involved aren’t difficult.”
— Joseph Tychonievich, “Rock Gardening: Reimagining a Classic Style,” 2016
I lost several ornamental plants in my garden last summer due to extended heat and lack of water (in spots where the sprinklers overshot plants closest to them), so I’ve decided to take author Joseph Tychonievich up on his recommendation to create a rock garden with heat and drought tolerant plants. I want an easy maintenance garden that will basically hold its own while I’m away in the summer and, according to Tychonievich, a rock garden can fit that bill.
Yet rock gardens aren’t just a smart choice for our hotter, dryer summers. Tychonievich notes that aesthetics is another reason to adopt rock gardening, particularly for folks who want to try out a fresh approach to ornamental landscaping. He points out, “The spare, architectural forms and dramatic flowering of alpines are in stark contrast to, and a welcome change from, the lush containers of annuals and thickly planted perennial beds that have dominated gardening trends for so long.”
One of the reasons I’m drawn to rock gardens is that I already have the basic foundation for rockeries in my landscape. For example, I mentioned last week that we created a raised berm across our front yard to slow down stormwater runoff, and we built a low retaining rock wall to keep the soil in place. Now I’m envisioning adding an assortment of large, medium, and small rocks to the berm and planting low-growing and mounding perennials against and in between this backdrop. I’m excited!
But hold on — there are a few things I need to think about before I haul in a bunch of rocks and start planting. Here are a few takeaways from the book that will set me up for rock gardening success:
Siting: Most alpine plants need lots of sunshine and good drainage. Raised berms or planting on slopes not only allows excess water to drain from the surface but also elevates the plants so they make a bolder impression in the garden.
Soil: Alpine plants need coarse, gritty, “poor” topsoil with little organic matter. These soils don’t hold water, so they are inconducive to pathogens that can rot plant roots and crowns. Most alpine plants grow in tight mounds or clusters to resist heat and water buildup; planting in fertile soils or applying fertilizers causes the clusters to loosen, thus spoiling the visual effect and making plants more vulnerable to diseases.
On the other hand, shady rock gardens are usually planted with woodland plants (since alpine plants grow above the tree line and don’t contend with shady conditions), and these need more fertile soils. My front berm is partially shaded, so I can add a thin layer of grit over shredded leaves or compost to provide the organic matter my woodland plants need while also blending the shady area with the sunny section of the garden for a cohesive whole.
Tychonievich recommends building rock garden beds with materials that have smaller pores (clay and compost) on the bottom layer, which will capture and hold water that drains from the top layer of fine gravel or coarse grit mulch. This mimics the environment where many alpine plants grow naturally and encourages the plants to send down roots for moisture during times of drought.
Rocks: It’s a good idea to use rocks that are found locally. We used mostly Oregon moss rocks for our berm wall and borders for the planting beds — they’re very striking during the wet season! — so I’ll look for various sizes of moss rock to keep the aesthetics consistent in the garden.
Tychonievich advises taking pictures of the garden area and drawing in where the rocks will be laid and/or piled. This will provide a good estimate of the number of rocks that will be needed. For a more natural look, he recommends laying the rocks in groups of three or five, depending on the amount of space available, and either partially digging in the rocks or pouring a thick layer of gritty mulch around them.
Crevice gardens are made by placing several flat stones vertically, filling the crevices in between the rocks with gritty soil, and adding small or large plants depending on the size of the crevices. A scree, on the other hand, mimics the base of a slope where smaller rocks and gravel have collected due to erosion and landslides. This type of rock garden is ideal for those who don’t want to haul in large, heavy rocks.
Speaking of hauling rocks, it’s important to figure out how you’ll get large rocks into the garden. An interesting alternative to handling heavy rocks is to make hypertufa rocks from a mixture of Portland cement, perlite or vermiculite, peat moss and water. Inexpensive and lightweight, hypertufa rocks will blend in with natural rocks in the garden. (Keep in mind, though, that cement is caustic until it sets, so wear protective gloves and a mask when mixing.)
Finally, Tychonievich offers good advice to new rock gardeners when he says to start small and expand as we learn more about growing alpines (or woodland plants in a shady rock garden). He says, “Leave some of your garden for your future self — who, by the way, will be more experienced and confident than you are now — to design and plant.”


2025 Community Choice Awards

-
-
-